1. What is Google Consent Mode?
2. What is Google Consent Mode basic ?
3. How to check your Consent Mode V2 basic setup?
Verify the consent notice UI
Website - Prior consent or in case of negative consent (optout)
Website - After positive consent (optin)
GTM - Prior consent
GTM - After positive consent (optin)
GTM - After negative consent (optout)
Still need help?
1. What is Google Consent Mode?
Google Consent Mode (GCM) serves as a link between data privacy and digital advertising by adjusting the behavior of Google tags to your users' consent status. This allows you to obtain insights on campaign conversions and other data, always respecting user consent choices for both ads cookies and analytics cookies, which will help you optimize and improve ad monetization.
After several months, Google has come up with a v2 of the feature. If needed, please read more about Google Consent Mode v2 and how to set it up in our article.
2. What is Google Consent Mode basic?
There are two modes available: advanced and basic. To know more about the difference between the two, please refer to this part of our article.
If you're not sure of the trade-off between advanced and basic, Didomi encourages you to consult with your Data Protection Officer or legal team.
In this article, we'll focus on verifying a basic mode implementation. This means relevant Google tags should only be triggered after the user has given positive consent.
In other words; the GCM integration is set up but data is only collected after positive consent.
If you've chosen this setup and just enabled GCM, we'll expect your tags behaviour to remain the same as before.
Also note, according to Google, in terms of benefits, by setting GCM basic mode: "...You will not get the full benefits of consent mode. For example, you will not get modeled data in your GA4 property to fill in the gaps for the missing observed data when users decline consent."
Source: Consent mode on websites and mobile apps
3. How to check your Consent Mode V2 basic setup
The goal is to verify that no requests are sent before positive consent is given or if consent has been denied.
How you've enabled GCM (through our console, or using the GTM template, or using the didomiConfig option - see this part of our other article) doesn't impact where to check your tags' behaviour.
The scripts' location is what matters for the upcoming checks. The checks will be done:
- On your website, if your Google tags are hard-coded
- Through the GTM preview (or on your website), if your Google tags are set in GTM
* Verify the consent notice UI
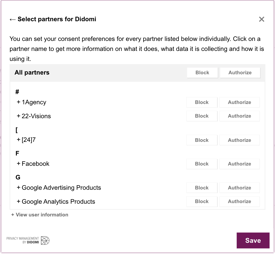
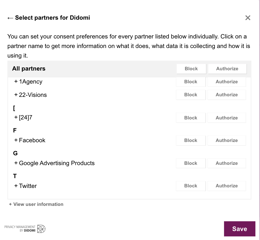
Based on the vendors you've enabled through the integration of the console or via the template, verify that the vendors are present and correctly displayed in the notice.
- Open your website in an incognito window
- Go to the vendors' view of your banner
- Check the vendors
Case 1: you've enabled both vendors
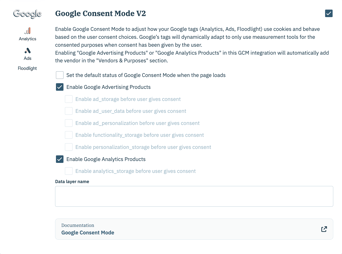
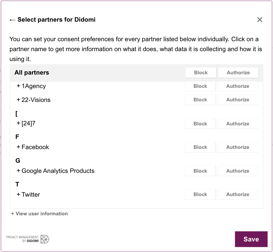
Case 2: you've only enabled the Google Advertising Products vendor
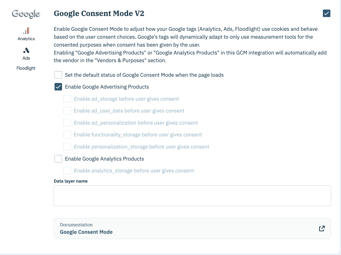
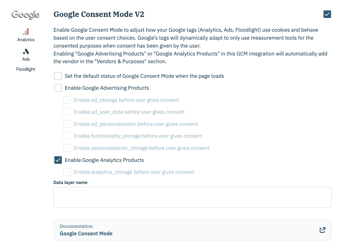
Case 3: you've only enabled the Google Analytics Products vendor
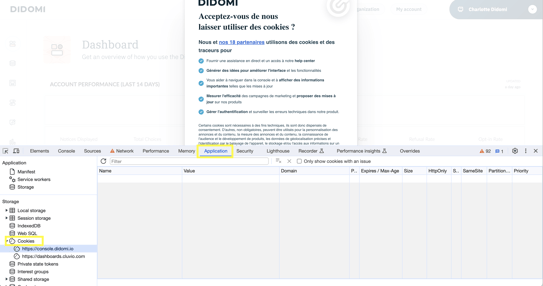
* Website - Prior to consent, or in case of negative consent (optout):
Make sure no Google Analytics, Ad Words, Floodlight or Conversion Linker cookies are dropped...
- Before accessing your website, open the dev tools with a right click and then "Inspect"
- Open your website in an incognito window
- Go to the "Application" (Chrome) or "Storage" (Firefox) tab of your browser console, on the top right
- Click on the "Cookies" section (in the left menu)
- Check that no Google Analytics, Ad Words, Floodlight or Conversion Linker cookies are dropped. To identify Google cookies name, you can read this article.
- Disagree to all on the notice
- Confirm those cookies are still not set
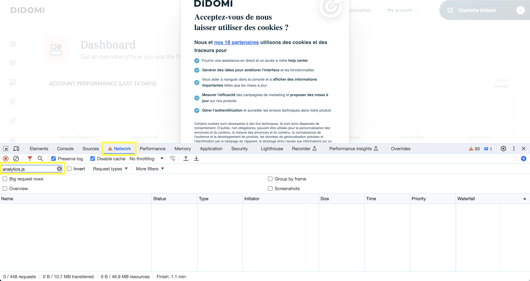
... and verify no Google Analytics, Ad Words, Floodlight or Conversion Linker hits / requests are sent
- Before accessing your website, open the dev tools with a right click and then "Inspect"
- Open your website in an incognito window
- Go to the "Network" tab of your browser console, on the top left
- Use the filter to examine that there are no requests containing the words "
analytics.js" (legacy), "gtag",collect", "gcs" or "gcd" parameters - Disagree to all on the notice
- Verify there are still no requests containing those terms
* Website - After positive consent (optin):
Verify the requests contain the proper gcd parameter after positive consent is given
- Before accessing your website, open the dev tools with a right click and then "Inspect"
- Open your website in an incognito window
- Go to the "Network" tab, on the top left
- Agree to all on the notice
- Check that the Analytics and Ad Words requests contain a "
gcd" parameter and that its value reflects the choices made by the user (depending on whether you've selected 1 or 2 vendors)
The value forgcdwill resemble a string of characters:gcd=11<ad_storage>1<analytics_storage>1<ad_user_data>1<ad_personalization>5
Each storage having the possible following value “e”, “r”, “n” or “v” which equalgrantedin a GCM update after user interaction with the CMP
-png.png?width=503&height=420&name=Untitled%20(1)-png.png)
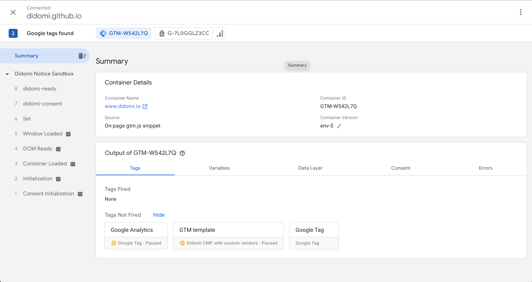
* GTM - Prior to consent:
Confirm Google tags are not triggered and Consent is not set
- Open Tag Manager in incognito mode (or clear your cookies and local storage for your website in your favourite browser)
- In your Tag Manager console, hit the "Preview" button
- Set your website's URL
- Establish that no Google Analytics, Ad Words, Floodlight or Conversion Linker tags are triggered (fired).
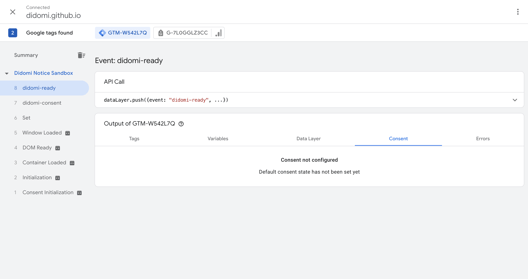
- If you've used the integration and have disabled setting the default status:
Verify that there is noConsentevent and note that the Consent tab is empty and indicates "Consent state has not been set yet"
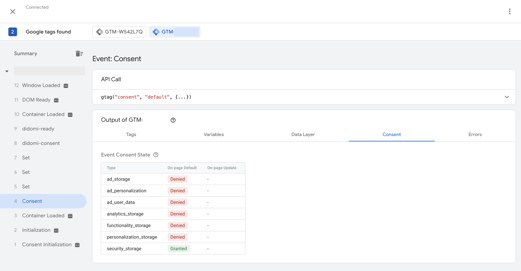
Otherwise, check that there is aConsent(default) event and that everything butsecurity_storageis denied
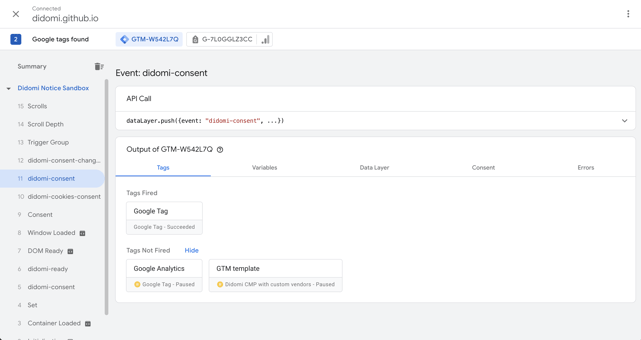
* GTM - After positive consent (optin):
Confirm Google tags are triggered and Consent is granted
- Open Tag Manager in incognito mode (or clear your cookies and local storage for your website)
- In your Tag Manager console, hit the "Preview" button
- Set your website's URL
- Agree to all in the notice
- Verify that Google Analytics, Ad Words, Floodlight or Conversion Linker tags are triggered (fired) as expected on the second
didomi-consentevent (or your trigger groups) - Check that there is a
Consent(update) event and that GCM signals are set as granted (depending on whether you've selected 1 or 2 vendors)

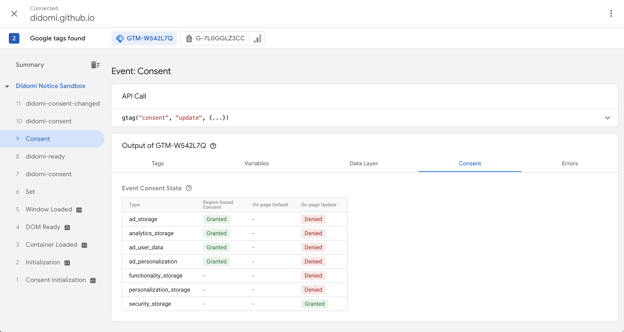
GTM - After negative consent (optout):
Confirm Google tags are not triggered and Consent is set as denied
- Open Tag Manager in incognito mode (or clear your cookies and local storage for your website)
- In your Tag Manager console, hit the "Preview" button
- Set your website's URL
- Disagree to all on the notice
- Verify that no Google Analytics, Ad Words, Floodlight or Conversion Linker tags are triggered (fired)
- Check that there is a
Consentevent and that every GCM signal (exceptsecurity_storage) is set as denied