Didomi supports Google Consent Mode v2. This guide includes the settings related to the new version. Learn more in our blog post.
Our teams are here to help you meet all Google requirements before March 2024.
1. What is Google Consent Mode and what's new in v2?
Setting the status of data storage permissions
Difference between basic and advanced mode
2. Set Google Consent Mode (CoMo)
Step 1 - Enable GCM (and set default status)
3- Using a window.didomiConfig
Option configuration - Enable Consent mode's TCF integration
3. If you upgraded from v1 to v2
1. What is Google Consent Mode and what's new in v2?
For advertisers, Google Consent Mode (GCM) bridges data privacy and digital advertising by adjusting the behavior of Google tags to the consent status of your users. This allows you to obtain insights into marketing campaign conversions and other data, always respecting the user's consent choices for advertising cookies and analytics cookies, which will help you optimize and improve ad monetization.
With Consent Mode, your Google tags will be able to determine whether or not a user has given consent for advertising and/or analytical purposes:
👉 If a user provides consent, your Google measurement tools will continue to work as usual.
👉 If a user does not provide consent, Google tags relying on Google Consent Mode will adapt accordingly. Specific measurement processes (modeling) will be used at a global level.
⚠️ Google Consent Mode only works with gtag.js, so make sure you use gtag.js (and not other legacy tags, such as ga.js, Analytics.js, or conversion.js)
Google Products and tags
Google Consent Mode only supports GDPR as of today.
For a multi-regulation notice, you may want to duplicate your tags and condition them according to the applicable regulation.
Google Consent Mode introduces tag settings that manage cookies for advertising and analytics purposes. This is done using the global site tag (gtag.js) or Google Tag Manager, and works with the following products:
- Google Ads
- Floodlight
- Conversion Linker
- Google Analytics
Learn more about GCM in the Google documentation.
What’s new in v2
As part of Google's ongoing commitment to a privacy-first digital advertising ecosystem, Google is strengthening enforcement of the EU User Consent Policy. Google users must send two new parameters in addition to ad_storage and analytics_storage :
| Consent mode settings | Consent Mode | Consent Mode V2 | Meaning |
| ad_storage | ✅ | ✅ | Allows the storage of data (such as cookies) related to advertising |
| analytics_storage | ✅ | ✅ | Allows storage (such as cookies) linked to analytics (e.g. visit duration) |
| ad_user_data | ❌ | ✅ | Sets consent for sending advertising-related data to Google |
| ad_personalization | ❌ | ✅ | Sets consent for personalized advertising |
functionality_storage: allows the storage of functional cookies used by a website or application (e.g. language settings)personalization_storage: allows storage related to content personalization (e.g. video recommendations)security_storage: this type of consent is always granted and allows security-related storage, such as authentication functionality, fraud prevention and other user protections
Setting the status of data storage permissions
The Didomi CMP listens for consent status updates from Google vendors to update the status of GCM settings:
-
If the Google Advertising Products vendor (SDK ID:
google) receives consent globally (the vendor and all its purposes are enabled):ad_storage,ad_user_dataandad_personalizationas well asfunctionality_storageandpersonalization_storageare set to granted - If the Google Analytics Products vendor (SDK ID:
googleana-4TXnJigR) receives consent globally (the vendor and all its purposes are activated):analytics_storageis granted
Difference between basic and advanced mode
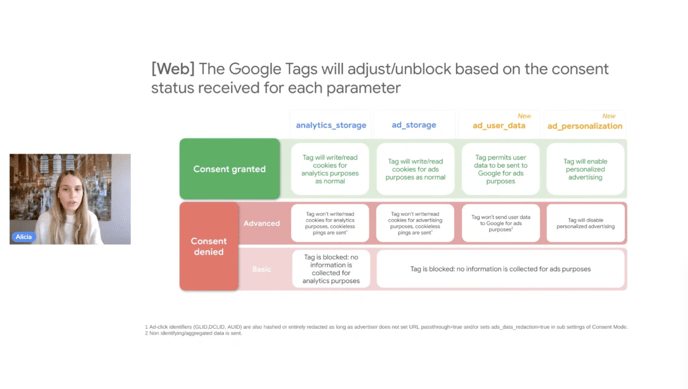
Source: Consent Mode Deep Dive for Web & App: Power Durable Performance in 2024
✅ Once consent is granted, associated tags will function normally
🚫 When consent is denied with basic consent mode, all tags are blocked and no information is collected
🚫 & ✅ When consent is denied with advanced mode, tags do not drop cookies, but cookieless pings are sent for analytics_storage and ad_storage
🚫 & ✅ When consent is denied with advanced mode, the beacon will not send user data for advertising purposes
🚫 & ✅ When consent is denied with advanced mode, the tag will disable personalized advertising
To learn more, see the Google documentation.
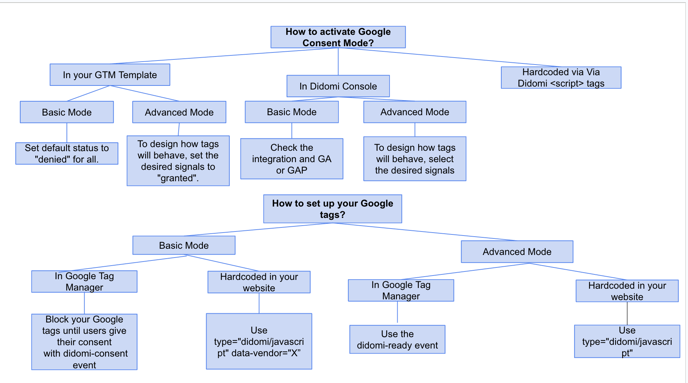
2. Set Google Consent Mode (CoMo)
Overview:
Step 1 - Enable GCM (and set default status)
👉 The default status is the status that is set when the page initially loads. You can have more details in the official Google documentation.
By default, if you choose not to set a specific status, Didomi will set all GCM permissions to denied when the page initially loads.
window.didomiConfig.⚠️ Make sure you don't use more than one way to configure GCM, as this could cause conflicts.
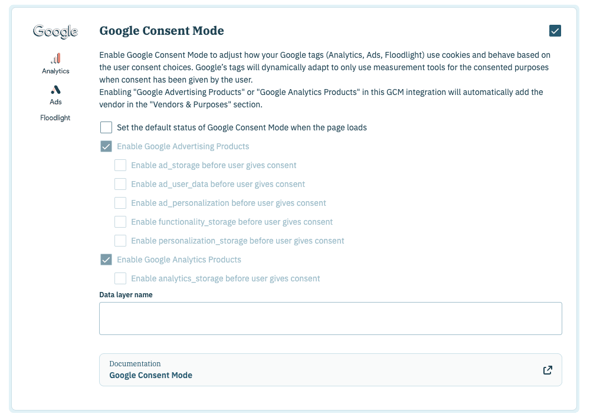
1) Using the Didomi console
ℹ️ GCM integration is activated by default when creating a new record. If you are creating a new record and do not want to use GCM, you will need to disable the integration manually.
- Go to the Consent notices section and click on the Edit icon corresponding to your notice
- Proceed to step 2. Customization, then to the Integrations section.
- Click on the Consent Modes tab.
- Enable the integration (enable the Google Consent Mode V2 toggle)
- You can activate the integration and select either the Google Analytics products vendor, or Google Advertising Products, or both vendors
⚠️ To enable the integration, you must enable at least one of the two vendors, otherwise a warning message will be displayed
👉 If you had a custom vendor for Google Analytics, your old vendor will still be selected. And you will have to deselect it if it is no longer needed.
To avoid losing data, make sure you configure your GA tags correctly before deselecting the vendor.
-
- For basic mode: you can leave the default settings with the toggle already enabled at the top and the appropriate vendor(s) also checked.
Default statuses are not taken into account because your Google tags are blocked from loading pages. You can skip this step and go straight to step 2.
- For basic mode: you can leave the default settings with the toggle already enabled at the top and the appropriate vendor(s) also checked.
-
- For advanced mode: enable the item "Set the default status..." to be able to make a specific choice on each of the associated sub-options. Enabled sub-options indicate that the status will be set to granted when the page initially loads.
- For example, if you enable "Enable ad_storage before user gives consent", on your website, the initial page load for ad_storage will be set to granted.
- For example, if you enable "Enable ad_storage before user gives consent", on your website, the initial page load for ad_storage will be set to granted.
- For advanced mode: enable the item "Set the default status..." to be able to make a specific choice on each of the associated sub-options. Enabled sub-options indicate that the status will be set to granted when the page initially loads.
⚠️ Do not use the GTM template if your notice uses any regulation other than GDPR.

- For basic mode: default statuses are not taken into account, because your Google tags are blocked when loading pages. You can skip this step and go straight to step 2
- For advanced mode: set the default status to GCM granted for the desired permission(s)
However, this setting can be useful for testing purposes.
<script type="text/javascript">

window.didomiConfig = {

  integrations: {

    vendors: {

      gcm: {

        enable: true,

        setDefaultStatus: true,

        defaultStatus: {

          analytics: false, //'analytics_storage' default status Basic mode

          ad: false, //'ad_storage' default status

          ad_user_data: false, //'ad_user_data' default status

          ad_personalization: false, //'ad_personalization' default status

        },

      }

     }

   }

};

</script>
Step 2 - Set up your tags
Basic mode
Google tags (Ad Words, Analytics, Conversion Linker and Floodlight) must be blocked until the user gives positive consent. This means that the settings will be "denied" by default or will not be set.
To configure Basic mode with Didomi you have 2 options based on where your tags are set:
- In GTM: block your Google tags using our GTM integration described in this documentation.
Note that to use basic mode, you must use thedidomi-consentevent. - Using Didomi tags attributes as described here:
Use the appropriate vendor to trigger your Google tags.
Example for Google Analytics:<script type="didomi/javascript" data-vendor="c:googleana-4TXnJigR" src="https://www.googletagmanager.com/gtag/js?id=GA_MEASUREMENT_ID"></script>
Advanced mode
Google tags (Ad Words, Analytics, Conversion Linker and Floodlight) should be loaded as soon as the SDK is ready.
The tags will then send data based on the default status.
In advanced mode, it is therefore important to define the default status that you want Didomi to expose.
To configure Advanced Mode with Didomi you have 2 options:
- With Google Tag Manager, use the
didomi-readyevent to ensure that Google tags are loaded once the Didomi SDK is ready and Consent mode is set (or a trigger group if necessary)
You can refer to this documentation.
For a multi-regulation notice, you may need to duplicate your Google tags. Since GCM is only supported under GDPR, you should configure two separate tags using the data layer variabledidomiRegulationName:
For the GDPR tag :
For the other regulation tag :
Alternatively, you could use two GTM containers, one for GDPR, one for the other regulations, and load one or the other based on the applicable regulation. - Using Didomi <script> tags attributes documented here:
Withtype="didomi/javascript"only
Your tags will load as soon as the SDK is ready, without a specific link with a vendor
<script type="didomi/javascript" src="https://www.googletagmanager.com/gtag/js?id=GA_MEASUREMENT_ID"></script>
Optional configuration - Enable Consent mode's TCF integration
Consent mode commands can be set based on the user’s choices in the TCF string. To do so, enable the option "Enable IAB TCF integration with Google Consent Mode" in the Didomi Console:

- Consent mode's TCF integration is only valid when you use both TCF integration and Google's Consent mode.
- It is only valid for advertizing consent types:
ad_storagead_user_dataandad_personalization. - It does not apply to non-advertizing consent types:
analytics_storage,functionality_storage,personalization_storageandsecurity_storage.
➡️ Results of enabling GCM X TCF integration
- When user consent is collected on your CMP, Didomi SDK will setup the
TCData.enableAdvertiserConsentModetotruefor bothgetTCDataandaddEventListenercommands. - Consent status for
ad_storagead_user_dataandad_personalizationwill then be calculated from the status of TCF purposes in the TC string, as defined in this documentation. - Consent status for
analytics_storageis not impacted by Consent mode's TCF integration. Didomi SDK will setanalytics_storageto granted if the Google Analytics Products vendor (SDK ID:googleana-4TXnJigR) receives consent globally (the vendor and all its purposes are activated).
3. If you upgraded from v1 to v2
Via the Didomi console
You don't need to take any specific action in this case.
The new consent mode permissions (ad_user_data and ad_personalization) are added with a default status = granted. You can change this setting if you want.
Via the GTM Didomi template
If you are already using Didomi's GTM template for consent mode v1, you will need to follow the following steps in order to use the latest version of the template:
- Login to GTM
- You'll see a warning, click on "View"
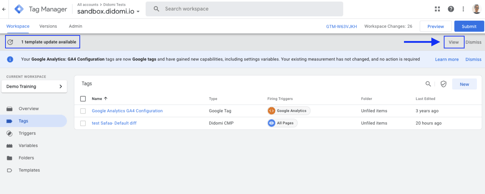
- Select Didomi CMP
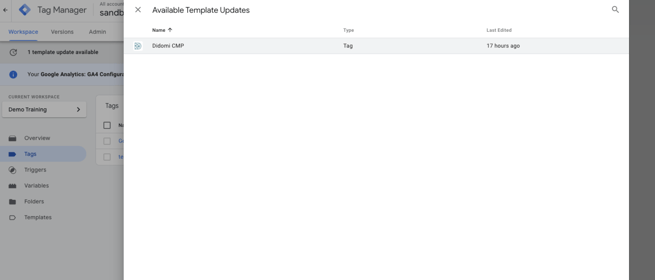
- Click on "Accept Update":
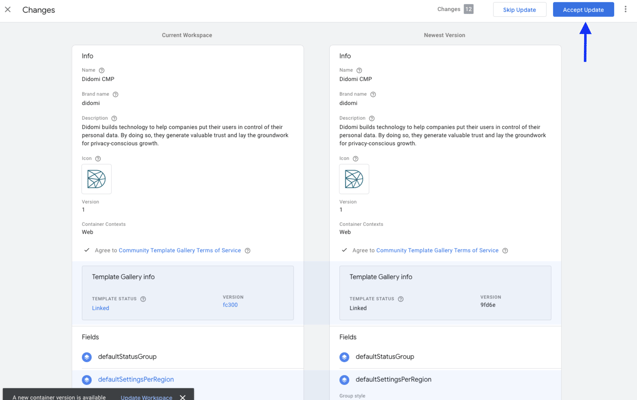
- New consent mode parameters will be automatically added and set to denied by default:

- If you want to use advanced mode, you can modify the status of these new permissions.
Via a window.didomiConfig:
If you are using Didomi's script tag, make sure the default state of newly added parameters is set.
*Custom data layer name
By default, Didomi uses dataLayer as the variable name for your Google Tag Manager dataLayer. The same name is used by default for Google Consent mode.
If you renamed your dataLayer, you can specify the use of another name through the integration or window.didomiConfig:
If you need further assistance or have noticed something unusual, please feel free to reach out to google-support@didomi.io.