Here's a quick guide to help you to create your Consent Notice with Didomi's brand-new console flow. Follow these steps for setup:
- Go to the Didomi console.
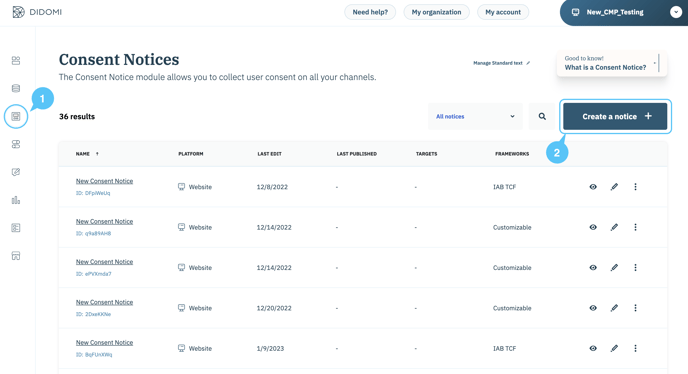
- Click on Consent Notices (1) in the left menu.
- Click on Create a notice + (2) in the top right corner.
🎉 You can now start creating your Consent Notice!
For the first creation of your notice, you will need to click on Save and Continue each time you move from one stage to another. Then, when everything is set, you can move from steps to steps to edit your notice, but don't forget to click on Save frequently.
✅ 1. Platforms
The first step allows you to choose the platform where you want to deploy your consent notice.

- Choose website, AMP website, mobile app or CTV app (premium feature).
- Click on Go to the next step.
✅ 2. Preset
In this step, you can choose if you want to apply a preset (ie. set of pre-configured parameters).

Choose between No preset and Available Frameworks.
Available frameworks are Google Consent Mode V2 and IAB TCF Framework and Microsoft Consent Mode.
If you select IAB TCF framework, the IAB-specific features are configured to ensure compatibility with the IAB.
- All IAB vendors are selected by default (you can still unselect some of these as needed)
- IAB standard text is displayed in the first layer of the notice and cannot be edited.
- IAB integration is selected.
- IAB TCF framework only applies to GDPR regulation.
If you select Google Consent Mode V2, the Google Consent Mode V2 features are configured to ensure compatibility with the Google requirements.
- Google Advertising Products and Google Analytics Vendors are selected by default (you can still unselect some of these as needed).
- Google Consent Mode Advanced is enabled by default but requires further implementation to be used (Implement Google Consent Mode V2 following our documentation)
- Microsoft Consent Mode, allows businesses to adjust the behaviour of Microsoft’s Universal Event Tracking (UET) tags based on user consent preferences.
Click on Generate my consent notice.
Enter the name of your banner (1).

✅ 3. Regulations
3.1. Regulations
Multiple regulations can be selected. In this case, specific parameters must be filled in for each regulation during the creation flow. The notice displayed will be based on user geolocation.
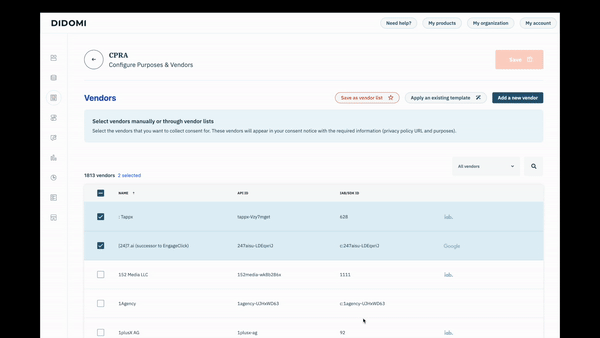
Vendors & Purposes
- For each regulation selected, click on Edit Vendors & Purposes to configure the list of vendors and purposes applicable per regulation.

2. You can now add the technology partners on your website for whom consent needs to be collected.
Run an audit of your website to obtain the list of vendors present on your website with our Compliance Report tool.
- You can now select your IAB vendors and other vendors.
-
- Here is a list of all IAB vendors.
-
Didomi already has a number of available partners (Facebook, Twitter and Whatsapp).
You can also create your own custom vendors and associated custom purposes.
⚠️ Before creating your custom vendors or purposes, don't forget to save the vendor setup you've just configured.
(Optional) Apply an existing Vendor lists in a regulation
- In regulation, click on Apply an existing template.
- Select a vendor list
- Click on Apply
⚠️ It will erase and replace existing current settings done in the regulation.
Create a custom vendor
To create a new vendor, click on Add a new vendor and fill in the required information.
- According to the GDPR, this is all the information required concerning a data processor.
- You can choose to link your custom vendors to an IAB purpose.
- If you wish, you can link your custom vendor to a customized purpose. In this case, you can also choose if you want your purposes to have consent or legitimate interest as a legal basis.
- Each custom vendor you create will generate a custom vendor ID. This allows you to block your vendor with our GTM integration.
Create a custom purpose
To create a custom purpose, consult our documentation.
IAB TCF Publisher restrictions
The IAB TCF Publisher Restrictions section allows you to restrict purposes vendor and specify the legal basis. You can read more about these restrictions in this article.
Group TCF purposes as stacks
You can also select and modify the stacks of IAB purposes that appear in the notice in the section Group TCF purposes as stacks. Find out more in this article.
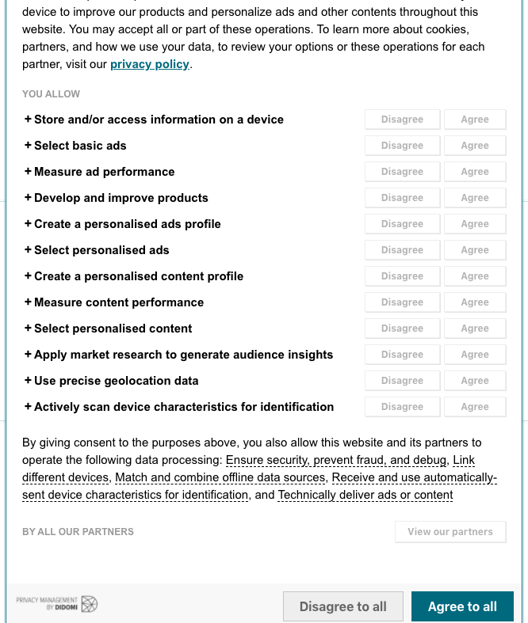
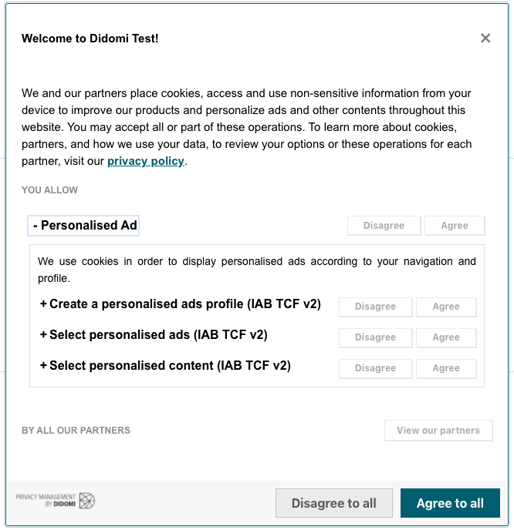
👉 Further down, you'll find a Purposes section, containing all purposes associated with the vendors you selected. These will appear in what is often referred to as the "preferences" view of your consent notice (generally the 2nd layer).
This is what it looks like:
(Optional step) Create a purpose category
You can also create your own custom category:
- Clicking on Add category.
- Select the language.
- Name the category.
- Add a description.
- Hit the Save button.
- Drag and drop the purposes you want to link to the category.
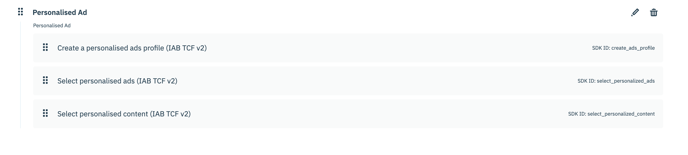
👉In order for the category to be displayed, you will need to add at least one purpose. Purposes will appear in this section according to the vendors you have selected above.
Once you have configured everything in the Vendors & Purposes section, click on Save to return to the Regulations step landing page.
Don't forget to configure the vendors and purposes for all the regulations you selected in the Data Manager section.
3.2. Country/Region
You can select the desired regulation/s and apply it to the countries/states needed; i.e. the notice will be displayed in the countries or regions selected.
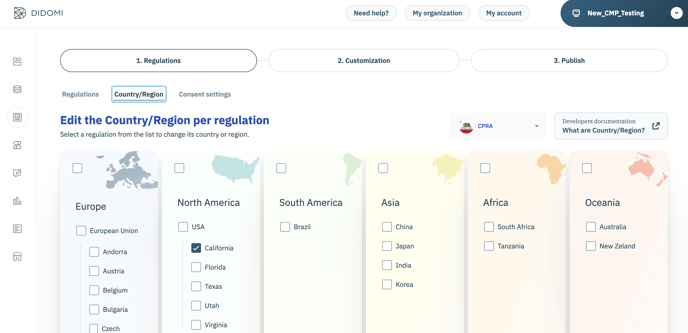
For example, if your company is based outside the European Union (EU), you can choose where you want to display the GDPR banner, or you can apply GDPR globally.
If you are an EU-based company, leave the Apply GDPR Globally box checked (at the botton of the page).
You can also display a specific regulation notice to other regions than the expected one (for example, display CPRA notice for other states).
For countries where no regulations are selected, no notice will be displayed to users. They will be opt-in by default.
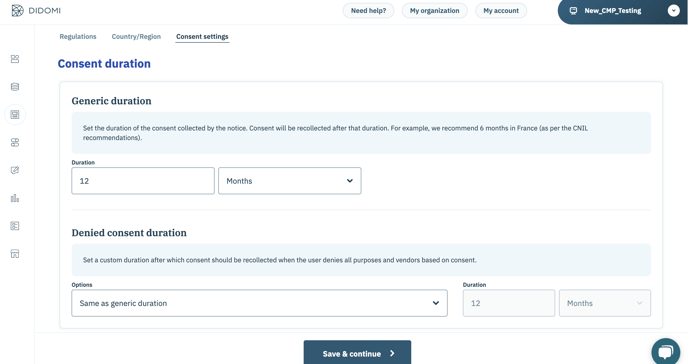
3.3. Consent settings
You can define all parameters related to consent collection.

Consent duration
- Generic duration indicates the duration of the consent collected, after which consent will be re-requested.
- Denied consent duration applies when a user denies all purposes and vendors based on consent. It indicates the time after which consent should be re-requested.
- Denied consent duration can be the same as generic duration, or it can be customized.
- In any case, ensure that the duration respects what is required under GDPR or any other regulation you are working with.
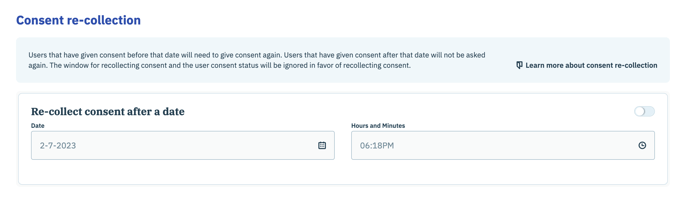
Consent re-collection
You can choose to re-collect consent on a specific date.
This is useful, for example, if you add a new IAB vendor and you did not select all IAB vendors in the vendor creation step.
Note, here you need to select an exact date for consent recollection. If you only specify a re-collection window in days (see below) the notice will not be redisplayed and the vendor will be considered "denied".
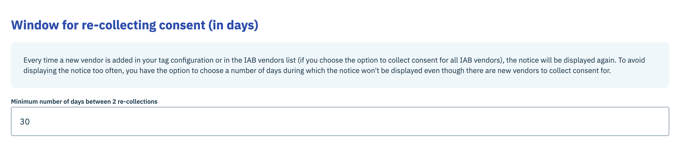
Window for re-collecting consent (in days)
Indicating the number of days after which a consent notice should be re-displayed is useful if:
- You add new custom vendors to your notice and need to re-collect consent.
- New IAB vendors are added to the framework and you have selected all IAB vendors in the vendor creation step.
Once Regulations, Country/Region and Consent settings are properly configured, click on Save & continue to move to the next step: Customization.
✅ 4. Customization
This is especially useful if you want to personalize your notices in line with your website design(s).
Certain parameters need to be completed depending on the regulations selected.
Preview
The preview panel (left side of your screen) offers a live preview of your consent notice, including all content and look & feel components.
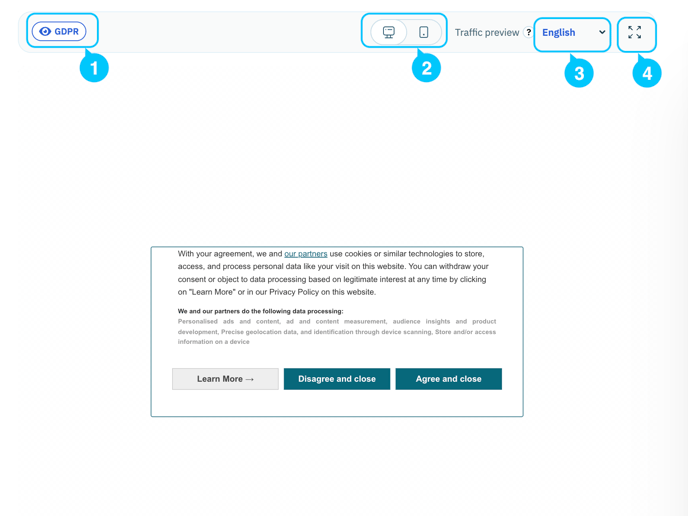
Any changes made are directly reflected in the Preview.
- (1) indicates regulation for which the notice is currently displayed. You can switch from one regulation to another.
- You can switch from desktop to phone screen preview using the toggle (2).
- You can select the language for your preview using the drop-down menu (3). The list of available languages is the same list you selected in the Content Editor.
- You can also display the preview in full screen (4), if desired.
Configuration applied via custom JSON and custom CSS is visible in the preview.
The preview is not yet available for mobile app, AMP & CTV environments.
Configuration panel
Use the configuration panel in each section of the Customization step to configure your notice as needed.
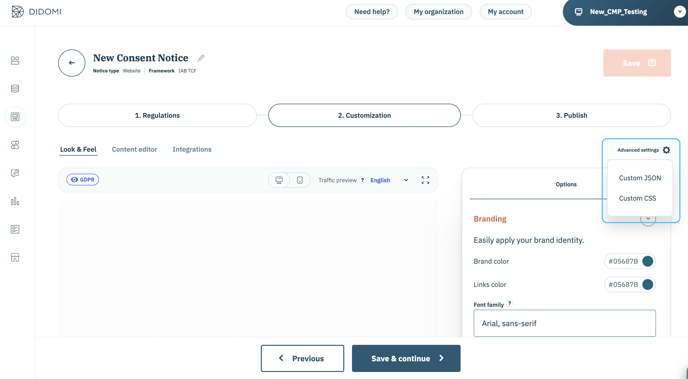
4.1. Look & Feel
-
The Customization tab includes a specific section for Look & Feel.

-
"Global settings" refers to the parameters that apply no matter the regulation.
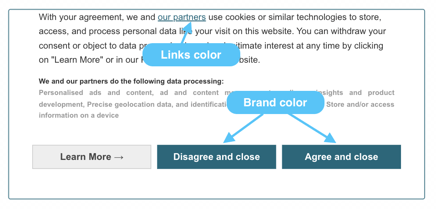
- Color settings:
- Brand color corresponds to buttons and overall notice colors.
- Links color refers to the color of your links.
- Choose the font to be used in your notice.
- Color settings:
- Now choose your "Specific settings", i.e., the parameters applied to a specific regulation.
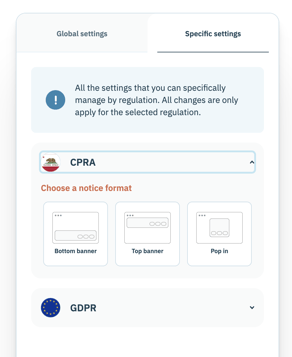
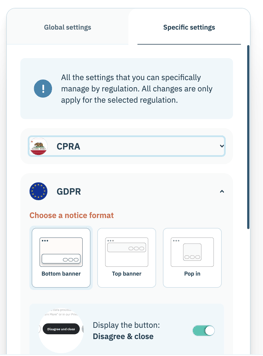
- Set your notice format/position:
- Bottom banner
- Top banner
- Pop in, blocking site access for the user until consent choices are made.
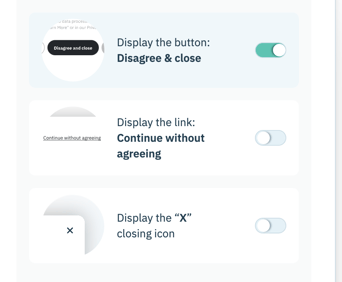
- For GDPR specifically, you can also specify the type of Disagree action to display:
- Set your notice format/position:
For further customization options, check out the Advanced settings section in our documentation.
4.2. Content editor
"Global" (applies to all selected regulations)
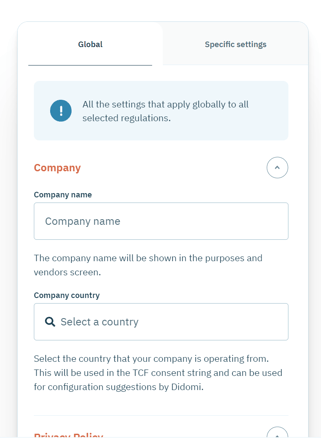
- Go to the Global tab.
- Enter the name of your company. This will appear on the second layer of your notice if the user clicks on Learn more. Company name will be featured just above the Preferences text.
- Select the country that your company is operating from.
- Add your company privacy policy URL.
- Select the Default language for your notice, displayed when the user's language is unavailable.
- Select the Enabled languages for your notice. These will be displayed according to the user's detected browser language. For example: if Spanish is enabled, any users on a Spanish browser will view the notice in that language.
Specific settings - 1st layer
- Go to the Specific settings tab.
- Inside each regulation, go to 1st layer tab.
- Set up the text you want to display for each enabled language.
- If you are using IAB TCF framework, Didomi provides a standard text that has been validated by IAB Europe and is regularly updated to remain in compliance with the framework. Approved standard text is mandatory for IAB integration.
- If you do not want to use Didomi's approved text, you can use a custom text. This option is not available if you use IAB integration.
- Enter additional text as needed. Additional text will be displayed above Standard text.
- Define labels for the available buttons in the first layer. All enabled languages will have a default translation.
Specific settings - Purposes
- Go to the Specific settings tab.
- Inside each regulation, go to the Purposes tab.
- Set up the text you want to display for each enabled language.
- Title
- Main text
- Define your labels for the buttons in the Purposes layer. All enabled languages come with a default translation.
- For GDPR:
- Choose to disable bulk actions (i.e., “Agree to all” and “Disagree to all” buttons). These are enabled by default.
- Choose to enable bulk actions (i.e., “Agree to all” and “Disagree to all” buttons) at the top of the Purposes list. These are disabled by default.
- Fill in the additional text you would like to display between the Partners button and the footer.
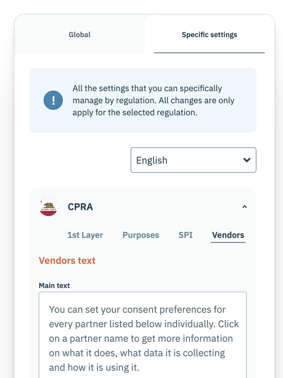
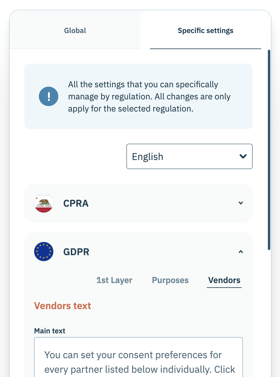
Specific settings - Vendors
- Go to the Specific settings tab.
- Inside each regulation, go to the Vendors tab.
- Set up the main text you want to display for each enabled language.
- Define labels for the different buttons in the Vendors layer. All enabled languages come with a default translation.
- Fill in the additional text you would like to display between the list of vendors and the footer (for GDPR only).
For further customization options, check out the Advanced settings section in our documentation.
4.3. Integrations
The first toggle refers to Tag Manager integrations, and the second toggle is for Advertising Integrations.
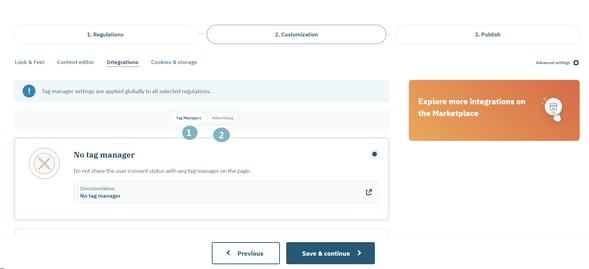
Tag managers
Didomi has integrations with a selection of tag managers, including Google Tag Manager. Our integration with Google Tag Manager allows you to send consent information to GTM. For more information, please refer to our 📰 dedicated documentation.
Tag manager integrations apply to all regulations.
Advertising
Our integration with IAB TCF can be manually selected or unselected. It is selected by default if you selected IAB TCF framework initially as preset.
Didomi also has integrations with Google Ad Manager, Microsoft Consent Mode, and Google Consent mode.
Advertising integrations are applied per regulation.
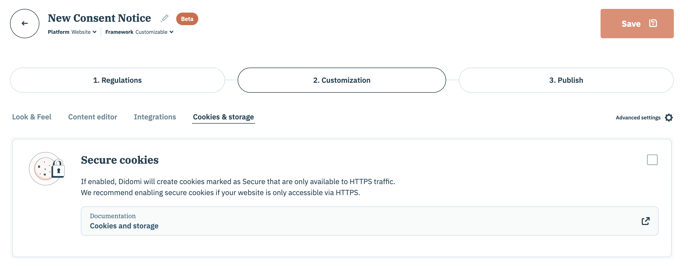
4.4. Cookies & storage
If enabled, Didomi will create cookies marked as Secure that are only available to HTTPS traffic. We recommend enabling secure cookies if your website is only accessible via HTTPS.
Check out our technical documentation for more details.
 4.5. Advanced settings
The Advanced Settings section helps you to support additional configurations that are not yet offered directly from the Didomi console.
There are two different possibilities:
- Custom JSON: to add a custom JSON object that will be merged into the notice configuration.
- Custom CSS: to further customize the look and feel of your consent notice. This will be automatically embedded in your website when the consent notice is displayed.
Make sure you update parameters for the appropriate regulation (or all of them).
👉📰 Please refer to our technical documentation for more details on what you can customize.
Once Look & Feel, Content Editor and Integrations are configured, click on Save & continue to move to the Publish step.
✅ 5. Publish
-
- You were using Didomi before the release of the new console flow (April 2023):
- Add the list of domains where your notice will be embedded.

- Enter your site URL without "https".
- Click on the plus sign (+) at the right to add your domain.
- You can add as many specific domains as you wish.
- Click on Publish.
- Add the list of domains where your notice will be embedded.
- You were using Didomi before the release of the new console flow (April 2023):
When specifying targets domains you need to copy and paste the "Generic code" (See below)
✅ 6. Implement
Configure the tags on your website
Configure the tags on your websites to block vendors by conditioning the loading of the tags to user consent.
- For IAB vendors, you have nothing to set up. All you have to do is declare them in the Vendors section. The consent string allows them to retrieve the user consent status.
- In the case of non-IAB vendors, these must be blocked, with loading of the tags made conditional on user consent.
📰 If you use GTM please refer to this documentation.
📰 If you use other Tag Managers , please refer to this documentation.
📰 If you do not use any Tag Manager please refer to this documentation.
📰 To block vendors on your mobile app, please refer to this documentation.
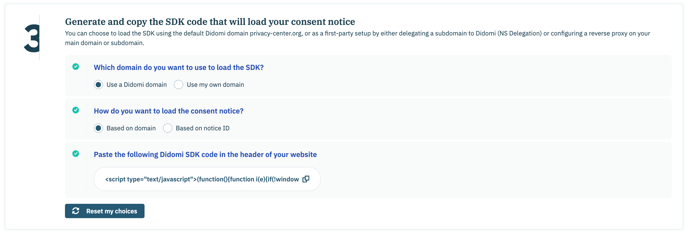
Add the Didomi SDK code snippet to your website header
Generate the Didomi SDK code that corresponds to your configuration. Then, copy and paste the snippet into the <head>section of your website.
You can load the SDK from:
- Didomi's default domain (
privacy-center.org) - Your own domain, using either DNS delegation or a reverse proxy.
For more information, consult the guide for serving the SDK from your domain.
If you started using Didomi before the new console flow release in April 2023, you can choose between a generic or specific SDK snippet, depending on whether your website uses a single notice or multiple notices.
Note: This feature is deprecated and available only for accounts created before April 2023.
Add the code for the opening link
Paste the code on your website where you would like the link for re-opening the notice to be accessed (for example, in the footer).

Check your implementation
For web notices, a fifth step is available and provide you with two quick accesses

- When you click on Access dashboard button, you will access the notice implementation check dashboard to ensure your notice is implemented properly in your website, including Google Consent Mode verification.
- When you click on Access Compliance Report button, you will be redirected on our Compliance Report module to ensure your implementation is compliant.
🎉 You're all set !
💡 If you have any questions, please reach out to our Support team!